
Meet Will
Will is the friendliest, easiest-to-teach bot you've ever used. He works on Slack, HipChat, Rocket.Chat, and more.
He makes teaching your chat bot this simple:
@respond_to("hi")
def say_hello(self, message):
    self.say("oh, hello!")
Lots of batteries are included, and you can get your own will up and running in a couple of minutes.
Will started by Steven Skoczen, and has been contributed to by lots of folks.
Check out the quickstart below!
Quickstart
Upgrading from Will 1.x or 0.x? Check out the Upgrade Guide.
Here's how to set up your system and get will running. If you already write python, it'll probably take less than 5 minutes.
Install prerequisites
Will doesn't need much, just python, a place to store things, and a way to communicate.
Will can store stuff in Redis, Couchbase, or local storage. Our recommended backend is redis, and we'll describe getting it set up below. Information on using Couchbase or local storage is here.
Will's communication layer works via publish-subscribe, and at the moment, only supports Redis. If that's a blocker for you, ZeroMQ, and a pure python built-in layer are coming in 2.1.
Install redis > 2.4
Official documentation is at redis.io.
If you're on Mac OS X, and using homebrew, you can simply:
brew install redis
On a Redhat (RHEL, Centos, Fedora) machine you can:
sudo yum install redis
sudo service redis enable
sudo service redis start
On a Debian (Ubuntu, Mint, KNOPPIX) machine to properly install follow the Redis Quickstart. But you can start more quickly with:
sudo apt-get install redis-server
redis-server
Install python > 2.6
Most modern operating systems (Mac OS X, Linux, BSDs, etc) ship with python installed, but if you don't have it, all the info is at python.org.
Install virtualenv
Virtualenv is a tool that lets you keep different python projects separate. It is highly recommended for will (and all other python development!)
The python guide has a great tutorial on virtualenv, if you don't already have it running. I'd recommend installing the excellent virtualenvwrapper library it mentions as well.
Set up a virtualenv for will
If you are using virtualenv wrapper:
$ mkproject my_will
# ... some output, setting up the virtualenv
$ workon my_will
(my_will) $
You're now all ready to install will!
Get will running locally
Setting up the project
Installing will is simple easy. Ready? Go!
From your virtualenv and the folder you want to set up your will in,
(my_will) $ pip install will
# ... output from a bunch of pip libraries installing

(my_will) $ generate_will_project
# ... output from will making your new project

(my_will) $ pip install -r requirements.txt
# ... install any needed libraries for your chosen backends.

(my_will) $ ./run_will.py
# .. the magic begins
That's it!
Note that the first time you run, you'll probably be missing some configuration. That's OK - run_will will check your environment, and walk you through getting and setting any necessary config. We'll go through the nitty-gritty later, but if you have any odd setup problems, look in config.py - that's where all of the non-sensitive data is stored.
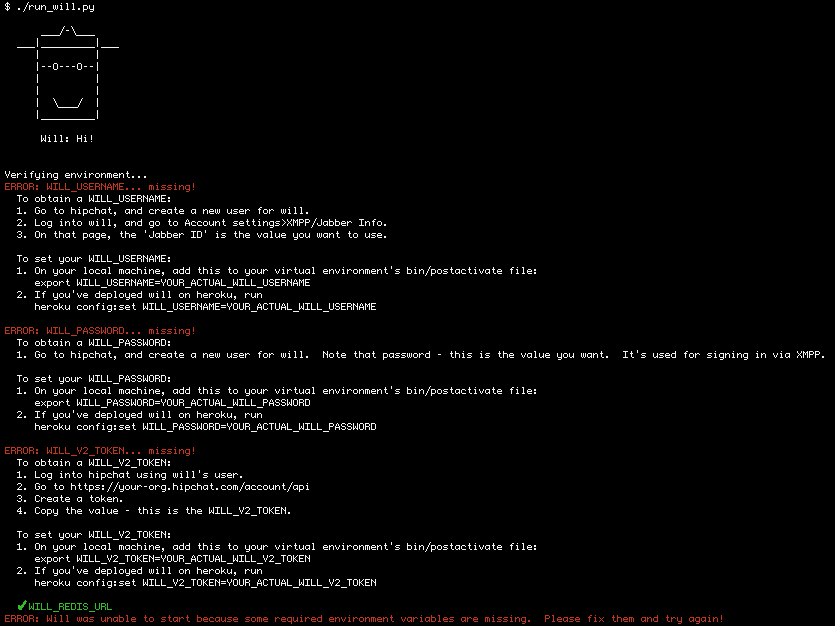 This is totally normal output.
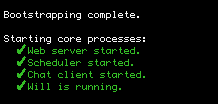
Eventually, you'll reach this screen of joy. Now, it's time to play!
You can also use generate_will_project with the --backends {Slack,HipChat,Rocket.chat,Shell} option.
Testing will out
Once your will is up and running, hop into any of your chat rooms (or just the terminal), and say hello!
@will hi

@will help
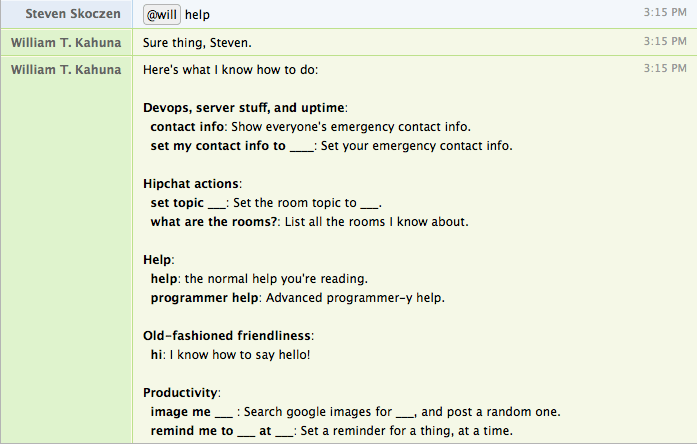
You're up and running - now it's time to teach your will a few things!